What Is the Type of File to Upload 3d to Fb
Create 3D type in 10 elementary steps
The relationship between type and epitome is widely regarded as the foundation of effective graphic design. No thing how good an image is, this relationship will brand or break a slice of work. Withal, information technology's frequently overlooked. If you want to communicate with your audience, why not brand your message actually stand out?
In this walkthrough I will show y'all how to apply a combination of basic tools and techniques in Photoshop and Illustrator to create 3D blazon with existent impact. We'll too look at some subtle lighting techniques to create extra depth within the type, which you can then experiment with in your own work.
I find it'south very of import to stay organised when working. Keyboard shortcuts, folders and clearly named layers will help to improve your workflow and, ultimately, save you a lot of time.
- Software: Photoshop and Illustrator CS4 or later on
- Projection time: 1.5-ii hours
- Skills: Combine Illustrator's 3D capabilities with Photoshop work, Manage your layers efficiently, Add subtle lighting techniques
- Support file
Step 01

First, we need to create the two elements of 3D type that we're going to somewhen work on in Photoshop. Open up up a certificate in Illustrator - a landscape A4 folio is fine. Pick a suitable phrase or discussion and your desired font, but try to keep it relatively simple. I'm going to use ITC Serif Gothic and the phrase 'Requite information technology some depth'.
Pace 02

Arrange the type as desired, and arrange the kerning and leading to enable each alphabetic character to breathe. Nosotros at present need to turn our type into paths. Select it and go to Type>Create Outlines. With the elements still selected, group them into one object. Change the colour to a mid to nighttime grey - I'm using hex lawmaking #7A7A7A.
Step 03
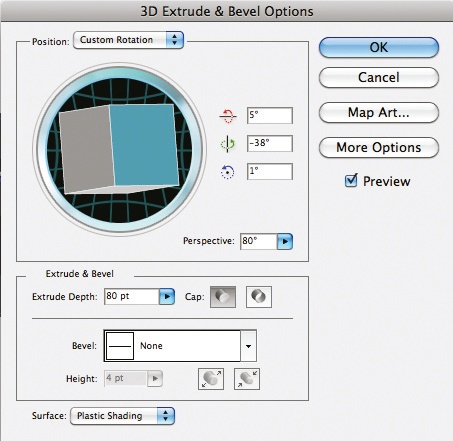
Select the outlined text and go to Outcome>3D>Extrude & Bevel. You can use the settings pictured here or experiment with your own. To enable us to edit the blazon farther, navigate to Object>Expand Advent. Take the Direct Selection tool and, property downwardly Shift, select the confront of the blazon but, cut information technology (Ctrl/Cmd+Ten) and create a new layer named 'Face'. Then go to Edit>Paste in place, group it and lock that layer.
Step 04
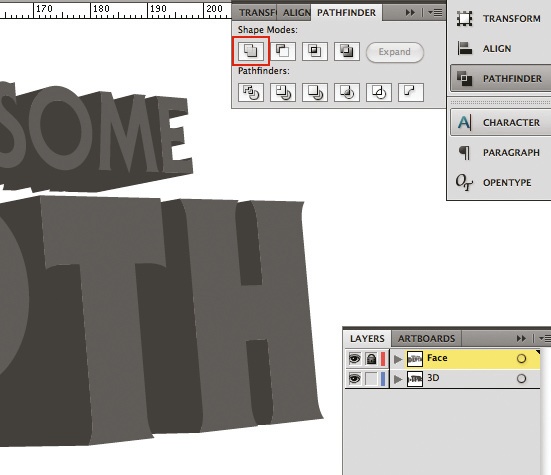
While the Face layer is locked, select the 3D elements of the text and use the Pathfinder console to unite them into i element. We now have what we need to take into Photoshop, so open up background.psd. Copy the Confront layer from Illustrator, paste it into your Photoshop canvas as a smart object and label the layer. Repeat this with your 3D layer and position it beneath the Face layer. The layers may be slightly out of line, then zoom in and adjust accordingly.
Step 05
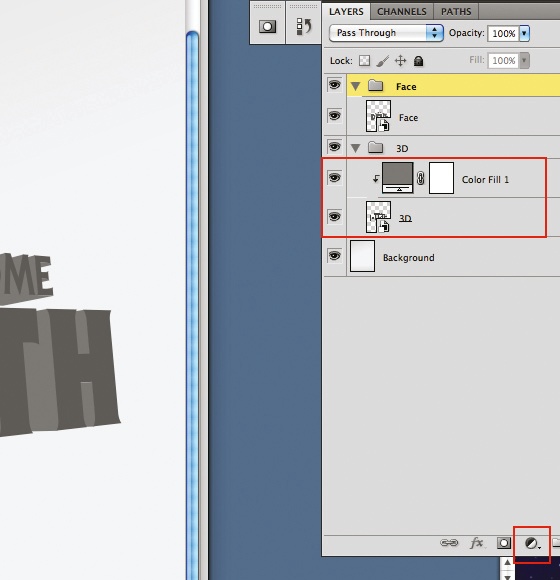
Drag your 3D layer to the folder icon at the bottom of the Layer panel and name the group '3D'. With your 3D layer selected, click the 'Create new fill up or adjustment layer' icon in the Layer panel, select Solid Color and use #303030. Next, hover between the colour fill and 3D layer, concord Alt/Opt+click. Your color fill up should now simply touch the layer below information technology.
Step 06
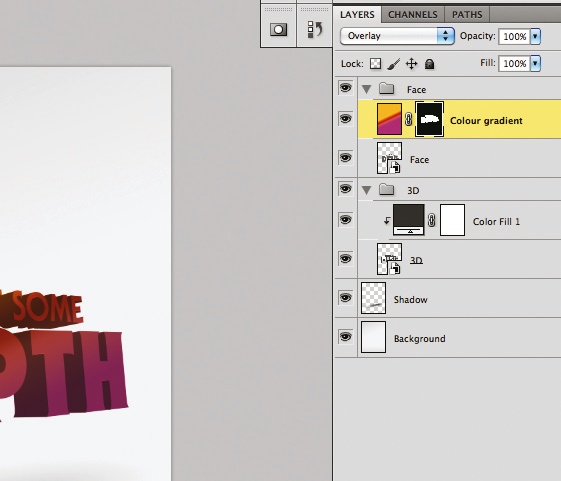
Moving into the Face up folder, create a colour gradient of your choosing to a higher place your type. With this layer selected, hold Ctrl/Cmd+click the thumbnail of your Face layer. Click the Layer Mask icon to create a mask on your gradient in the shape of your type. With your new mask now selected, Ctrl/Cmd+click the thumbnail of your 3D elements and make full them with white. Turn the gradient layer'south blending mode to Overlay.
Step 07
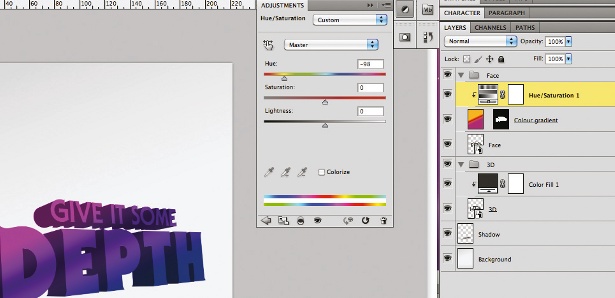
Create a new Hue/Saturation adjustment layer above your slope, hold Alt/Opt+click betwixt the layers to apply it to the gradient layer. Past moving the Hue slider you tin can create some interesting alternative colours. I'm going to settle on -98. We're now going to add together some shine and other effects. Ctrl/Cmd+click on the face up thumbnail over again. Go to Select>Modify and set Contract to 5px, then create a new layer named 'Shine' and fill up it with white.
Step 08
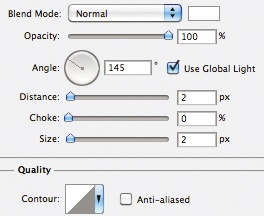
Select the Shine layer, click the New Path icon in the Paths tab, and describe a moving ridge shape with the Pen tool over the tiptop and lesser line of blazon. Ctrl/Cmd+click the thumbnail of your new path and go back to the Shine layer. Delete the lower white sections and set the blending mode to Overlay. Select the Face layer and get to Layer>Layer Manner>Inner Shadow. Prepare Alloy Mode to Normal, Opacity to 100%, Angle: 145°, Distance and Size to 2pt and tick Use Global Light.
Pace 09
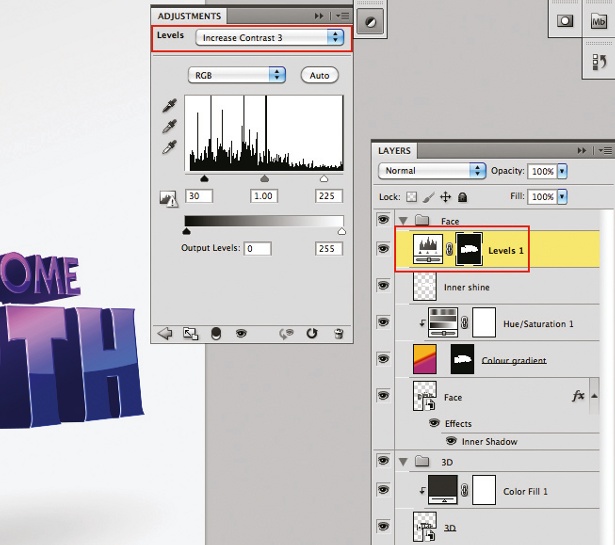
Create a new Levels adjustment layer above your Smooth layer and mask it so that it only affects your type. Select Increment Contrast from the driblet-down bill of fare in the Adjustments panel or change to your preference. Create a new layer, 'Noise', become to Edit>Fill and set Use to 50% Gray. So go to Filter>Racket>Add Noise>8%. Striking OK and ready the Noise layer blending mode to Soft Light. Apply the type mask equally y'all did with the levels.
Step x

Create a new layer chosen 'Glows', select the Radial Gradient tool and fix it from white to transparent. Concord Shift and draw, say, three radials where light will break between the letters. When you lot're happy, prepare the opacity of the Glows layer to seventy%. Then select all the layers apart from the background, duplicate them, merge them and characterization them 'Soften'.
Now duplicate your Soften layer, rename it 'High Pass' and turn it off for a moment. Select your Soften layer, and add together a Gaussian Blur at 50px and hit OK. Set the layer blending mode to Soft Light and its opacity to 50%. Select your Loftier Laissez passer layer and desaturate it. Go to Filter>Other>High Laissez passer>40px, set the layer blend to Overlay and yous're washed.
Words: Alex Gill
Liked this? Read these!
- Download the all-time free fonts (opens in new tab)
- Free graffiti font (opens in new tab) option
- Gratuitous tattoo fonts (opens in new tab) for designers
- The best costless web fonts for designers
Related articles
Source: https://www.creativebloq.com/3d/make-your-type-stand-out-1122703
0 Response to "What Is the Type of File to Upload 3d to Fb"
Post a Comment